A Guide to Digital Kitbashing
Max McDougall of McDougall Designs takes three of our Atlantic Digital file sets and gives you a step-by-step tutorial on digital kitbashing! Read on to discover how you can leverage the thousands of digital files in our collection to create models that are uniquely your own!

Artwork furnished by Wargames Soldiers and Strategy Magazine and by Georgie Harman of Red Fox Illustrations
In this article I am going to discuss digital kitbashing, as well as go through the process step by step. Please note that while this is how I go about this process, it is not the only way. I encourage you to experiment and have fun learning.
What is Digital Kitbashing?
Digital kitbashing is a phrase that came about during the advent of 3D printing. The term describes taking pieces from two or more STL file sets and “bashing” them together, similar to how hobbyists have converted miniatures in other media (plastic, metal, resin) for decades. The key detail is that this is done digitally before printing the physical result.
Kitbashing before printing allows a hobbyist to combine parts without having to worry about gluing individual pieces together (which, with resin parts, can occasionally be challenging.) While the process is relatively intuitive, there are some factors that new hobbyists may miss, and this article aims to assist with that.
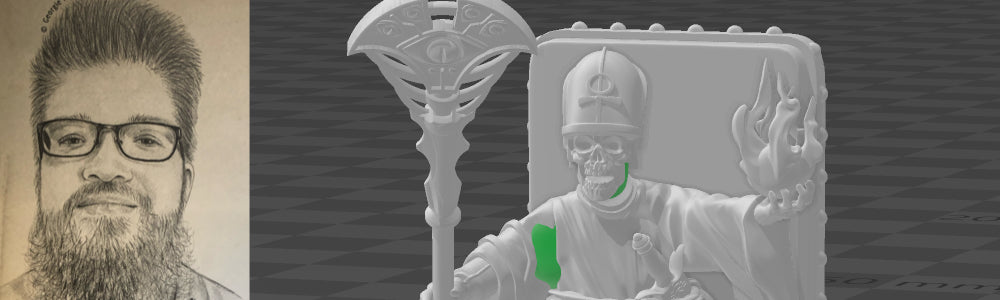
For this example, conversion, I will be using the Xerxes Triumphant, Egyptian Undead, and Classic Fantasy Cultists sets from Atlantic Digital to create a Lich King. In many RPG settings, a lich is a penultimate undead creature able to terrorize entire kingdoms. They also make great leaders for undead armies in wargaming.
To do this, we will need to have the sets unzipped in a folder, along with a program to manipulate them with. I use 3D builder from Microsoft, which is free, and many times already installed on Windows PCs.
HOT TIP: Save your work regularly! First as a .3mf project file (if working with 3d Builder) and then as an STL file when complete.
Step 1: Open Parts in 3D Builder
This step is simple but crucial. I select the parts I want to use and gather them in an open 3D Builder window. Doing so allows you to get a rough idea of how you want things to go together. I also orient the parts at this time so that I can have a better view as I work. Often 3D Builder will open files at odd angles. For example, the Xerxes body used in this conversion loaded in on his back.
You can orient such files by selecting them, and then choosing the selection method via the tool bar at the bottom of the window. Then, use the directional arrows that appear to orient the file how you wish.


Step 1.5: Remediate File Issues
Sometimes, files open at larger sizes. Sometimes they open and the software identifies an issue. In both cases, you have to remediate these issues before you continue. For the former, you can simply adjust the files unit size when it loads in (see the image below.)

If the software identifies an issue, it will either load in with a red border around the object, or simply not load the object at all. If the object loads with a red border, I suggest waiting until you have all your parts gathered before selecting those with issues and clicking repair.

Step 2: Initial File Editing
As you may be able to tell, the head I’ve picked for this conversion is rather large compared to the body. This is solved by selecting the file, clicking the scaling option on the toolbar, and dragging inwards from one of the corners that appears.
It's important to note that scaling like this can sometimes cause issues with loss of detail, however for a head like this, I don’t think there will be much of an issue.

Step 3: Loose File Joins – AKA Dry-Fitting Parts
By selecting parts in turn and maneuvering them with your mouse (click and drag, in essence) you can dry fit parts. In this way, you can identify if you need to adjust file scaling and fine-tune your conversion. This is also the step where your miniature starts to come together.
HOT TIP: If you have a file selected, you can hold the shift button on your keyboard and click + drag the file into place with greater precision than if not holding the shift button.

Step 4: Strengthening Join Locations
Now that we have our lich with all his extremities roughly in place, it’s time to fill in any gaps and otherwise make the joinery at the arms and neck strong. If you want to check for hollow areas, you can hover your cursor over the parts listed on the right-hand side of the 3d Builder window and the program will make them semi-translucent until you move your cursor.
To strengthen the joints, we are going to introduce primitives. For those who don’t know, primitives are simple shapes like spheres and cylinders. On the toolbar at the top of the 3D Builder screen you will see a tab that says insert. You can then click on the primitive that you want to use. For this conversion, I’m going to stick with spheres.


As you can see above, the sphere spawns in at a rather large size. Use the scaling tool to decrease this, as discussed in Step 2. The sphere also spawns colored, and you can adjust this in the paint tab at the top of the screen. You can also do this for any other part, but you must have the part you want to edit selected.

Manipulate your sphere and place it in the joint you want to strengthen. In this case, I’ve started with the right arm.

As shown in the image below, the sphere overlaps and extends out past the sculpted arm. To resolve this, you can select the sphere and use the scaling tool to adjust its size and the directional arrows to adjust its shape.

Once satisfied, repeat this process for the other joins. If you want to speed up your work, select the sphere you’ve already made and then navigate to the object tab at the top of the screen. You can then click duplicate and a new sphere/primitive shape will appear on the same axis as your previous item.
The key here is that you extend the primitive shape into the main body, so that any gaps are filled.
Step 5: Merge Parts
Once satisfied, select all your parts, navigate to the edit tab at the top of the window, and click merge. This process will combine all the parts into a single item and may take a moment or two to complete.

Final Steps:
After merging your new model together, I highly recommend that you save it as an STL file, rather than updating the save on your project file. In this way, you can preserve the project file if you want to edit the model in the future (such as changing out the arms – particularly useful when making converted infantry models.)
Once saved in STL form, your new model is ready to be supported and printed. You can support it yourself (and I highly recommend anyone 3D printing learn to support their own models) but that would be an entire article of its own.
Below you can see the completed model made during this tutorial, sat on the throne from the Xerxes set (but not merged, this is just dry fit to test.) He looks ready to lay some dark magic down on some unsuspecting dungeon delving adventurers!

In closing, digital kitbashing is an invaluable tool for a hobbyist looking to 3d print their own figures. You can create truly unique armies and miniatures in this way and make a collection that is uniquely yours. I hope you enjoyed this step-by-step process. If you’d like to see more, please interact in the comments below, and let us know.
Note: Each month Wargames Atlantic hosts two painting contests on our Legion forums. One of these is specifically geared towards our Atlantic Digital range of products. Enter your own conversions (after printing and painting) and be prepared to win awesome prizes! We can’t wait to see what you create!
Comments
Leave a comment